Creality Ender 3 Ender 5 and CR10 Hotend Repair
Creality Ender 3 Ender 5 and CR10 Hotend Repair, Understanding how to troubleshoot and repair your Creality 3D printer hot end is an important skill to ensure your printer continues to run consistently and produce quality results. This article takes a deep dive into the standard Creality hot end, looking at how the hot end works and how to troubleshoot problems with extrusion and other printing issues. The hot end we’re discussing in this article is used on the Ender 3, CR-10, and all other Creality 3D printers, but the information is applicable to most 3D printers from other brands as well.
If you have experienced any of these issues with your 3D printer, you most likely have an issue with your hot end:
- 3D Printer is jamming frequently
- Your 3D printed parts look inconsistent or under-extruded
- You are seeing Thermal Runaway errors
- The 3D printer is making a clicking sound when you print
We’ll discuss the causes of each of these issues, and how to fix each one to get your 3D printer back up and running and producing great results.
Introduction to the Creality Hot End
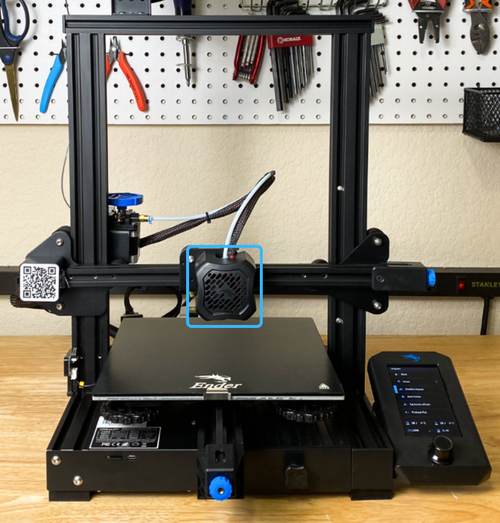
Before starting, take a minute to find the hot end on your printer. The same hot end design is used on the majority of Creality’s 3D printers, with a characteristic red heat sink. If you follow the path of your filament, you will see that it first travels through the extruder on the side of the printer, which is what pushes the filament to the hot end. Next, the filament travels through a PTFE tube to the hot end, and finally is deposited on the print bed to form the printed part.
Before getting into the inner workings, it is also important to understand how the hot end works on a high level. Put simply, the hot end is the component which melts your filament so that it can be deposited layer by layer to build a 3D printed part. While this sounds simple, there’s more than meets the eye, since the hot end must maintain a specific temperature to ensure quality printing. Another important job of the hot end is to make sure the filament melts only when it reaches the nozzle, but stays cool and solid before that point.
The Hot and Cool Zones
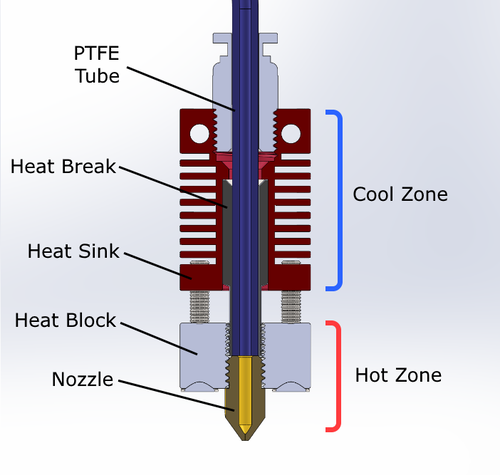
The hot end has two distinct temperature zones, the lower hot zone, which is heated by a heater cartridge, and the upper cool zone, which is cooled by a heat sink and fan.
As filament enters the top of the hot end through the PTFE tube, it stays cool and rigid as it moves through the cool zone. As the filament travels into the hot Heat Block and Nozzle, it rapidly heats to the point of melting before being deposited onto the print.
You’ll notice that the Heat Break, which surrounds the PTFE tube and spans both zones, is very thin in the empty space between the hot and cool zones. This minimizes heat transfer to the cool zone. Some heat still escapes to the cool zone however, so a Heat Sink and Hot End Fan (not pictured) are also needed to keep this area cool.
You may be asking: why is it so important to keep the filament cool as long as possible before it reaches the nozzle? The answer is to prevent filament jamming in the hot end. If the filament begins melting or softening too soon, the pressure of pushing the filament will cause it to widen. You don’t want that. The friction of this widened filament against the walls of the PTFE tube causes the filament to jam in the hot end and fail to print.
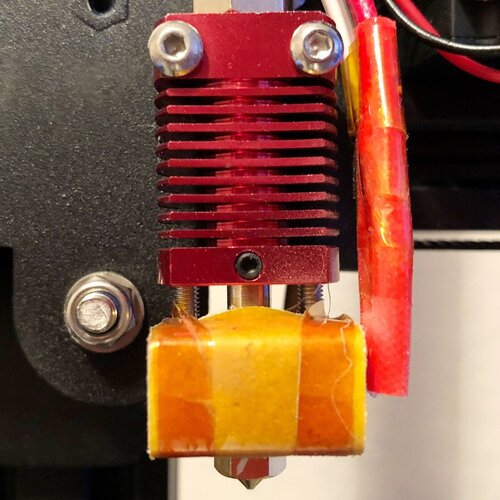
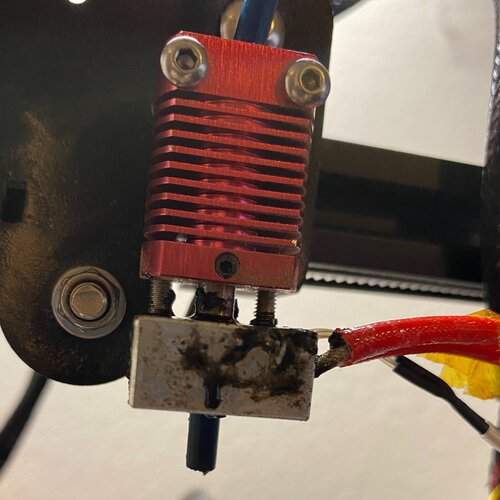
How the Hot End is Heated
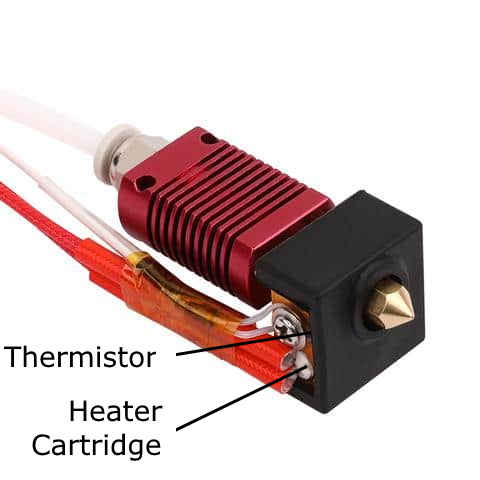
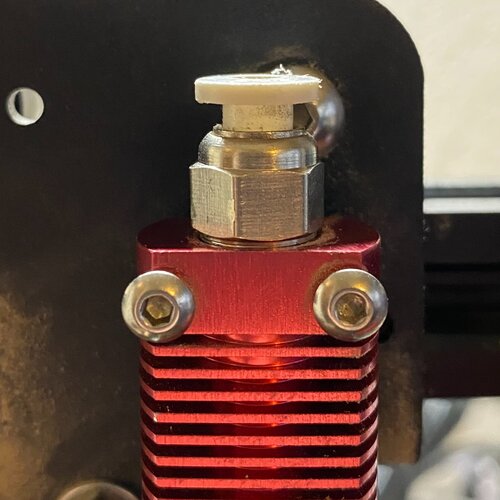
You’ll notice that there are two sets of wires leaving the side of the heat block. These wires lead to the Thermistor and the Heater Cartridge, which work together to ensure the hot end stays at the desired temperature:
- The Heater Cartridge generates heat when supplied with power by the printer. This heat spreads through the heater block and the nozzle, and eventually to the filament. The larger red wires connect to this component to the printer mainboard.
- The Thermistor measures the temperature, which the printer controller uses to turn off the heater cartridge once the temperature exceeds the set point. The smaller white wires connect the thermistor to the printer mainboard.
These components are both removable and can be replaced if needed. The thermistor is held in place with a small Philips head screw, while the heater cartridge is secured with a small grub screw near the nozzle. We’ll discuss how to replace these in more detail later on.
Common Issues with the Creality Hot End
Now that you have an understanding of how the hot end works, let’s look at what happens when things go wrong. In this section, we’ll take a look at some common symptoms and describe the root cause and how to fix it.
3D Printer does not heat up to the set temperature
If the 3D printer is getting close to the desired temperature but not quite there, for example reaching 165-170C, ensure that the hot end is insulated with a rubber hot end sock. This helps keep the heater block hot, and makes sure the hot end fan doesn’t cool the heater block. If you are still seeing issues with reaching the desired temperature, calibrate the PID tuning to make sure the printer’s controller is correctly regulating the temperature.
3D Printer temperature readings are incorrect
If the temperature is not rising at all and staying around 30-40C, it is likely that the Heater Cartridge is not functioning correctly.
If the temperature reading is clearly inaccurate, such as a reading 0C or -15C, the issue is most likely that the thermistor is disconnected or defective.
3D Printer Stops and Displays a Thermal Runaway Error
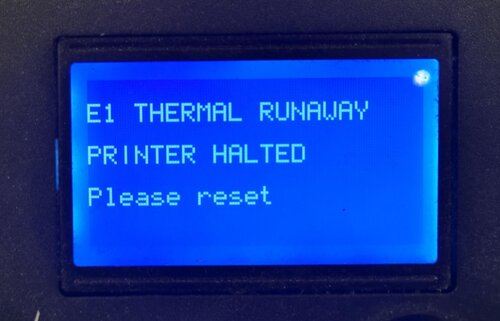
Thermal runaway errors are a safety feature which protects the printer from overheating the hot end to unsafe temperatures due to a hardware malfunction. Any time that the printer is powering the heater cartridge but is not seeing the temperature increase, the printer will cut power to all heaters and display this error. You should not attempt to print anything else until you have found the cause of this error.
Before checking anything else, it is important to check for any visible issues with the heater cartridge and thermistor:
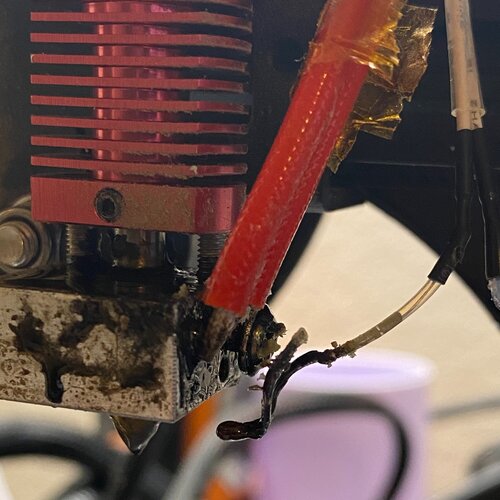
- Unscrew and remove the hot end enclosure to inspect the hot end.
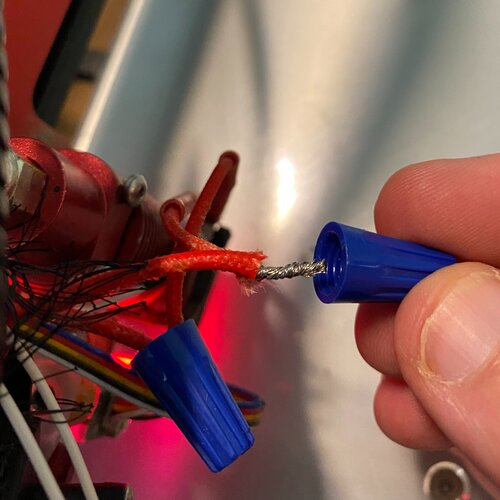
- Inspect the wires coming from the thermistor and heater block. If any wires are broken, repair them (you can use solder or screw connectors). If the wire damage is close to the thermistor or heater cartridge, we recommend replacing the part to avoid possible shorts.
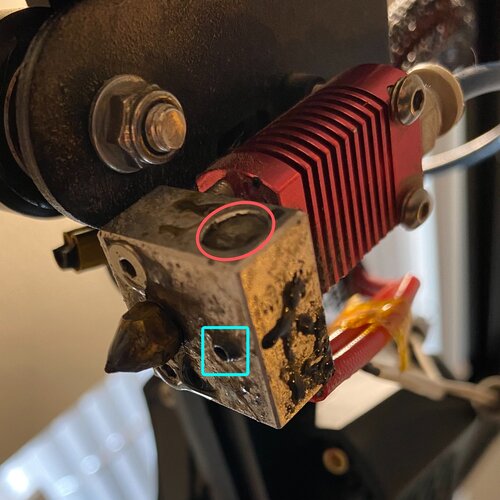
- Ensure that the thermistor is completely inside the small hole in the heat block and that the securing screw is present and tight. The screw should not be loose, but once you feel mild resistance, stop tightening it.
- Ensure that the heater cartridge is contained within the hot end, and that it does not move if you push on it with an allen wrench from the side opposite the wires. If the heater block is loose, remove the hot end sock and tighten the grub screw beneath the cartridge using the smallest Allen wrench provided with the printer.
If you don’t see any issues, another potential cause of this error is if the heater block is getting cooled by the hot end fan. This cooling will cause the temperature to stop rising despite heat being applied, triggering the error. To correct this, ensure that the heater block has insulation. We recommend a silicone hot end sock which can be easily slid on to the heater block.
If you cannot diagnose the issue, we recommend that you replace the hot end assembly; you shouldn’t ignore this error.
3D Printer is Jamming Frequently
Jamming, or when the filament gets stuck in the hot end and is not able to be pushed through, is almost always caused by an issue with the hot end. This issue also causes another common symptom of a clicking sound coming from the extruder. This sound occurs when the filament is stuck, so the extruder gear starts skipping on the filament since it is unable to push it through the hot end.
To confirm the issue is indeed a hot end jam, push the lever arm on the extruder to relieve the spring pressure against the filament, and attempt to manually feed filament through the printer. If you are unable to push filament through in this way, the issue is related to the hot end. Otherwise, the issue is likely that the extruder is not pushing the filament sufficiently, so you should start your investigation there.
If the issue is with the hot end, there are three common causes for this issue to investigate:
1. The nozzle isn’t getting hot enough to melt the filament as it passes through the nozzle
We’ll start with the basics – if the nozzle isn’t hot enough, the material won’t melt or will not melt fast enough. To determine if this is the case, check the temperature readings on your printer while trying to print. First, ensure that you are setting the temperature to the correct value for the filament you are using. We recommend 200C for PLA, 240C for PETG, and 245C for ABS. Also, double check that the filament you are using is actually the material you are expecting (this has happened to us more than we care to admit). If you are seeing issues where the temperature reading isn’t what you expect, check the steps in the previous section.
If you are sure the temperature of the hot end is correct, continue to the next potential issue.
2. The filament is beginning to melt too soon, and is expanding in the PTFE tube and getting stuck
If the temperature reading is correct, the issue may be related to the filament getting too hot, or more accurately, getting heated too soon. If the cold zone is not being sufficiently cooled, the heat from the hot end will seep into the cold zone, known as heat creep, which will cause the filament to start to soften in the PTFE tube before it reaches the nozzle. The pressure from the extruder will squish the filament and widen it, eventually to the point that the filament is unable to pass through the hot end.
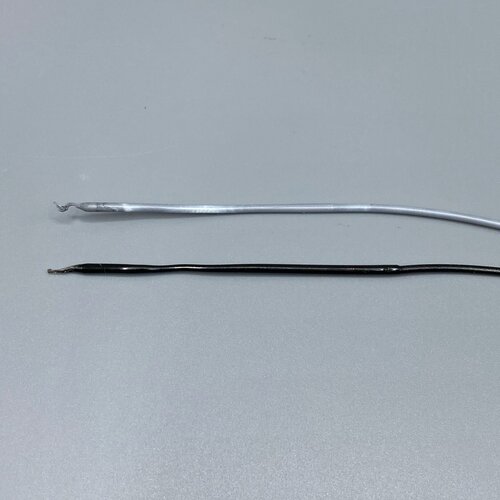
Before investigating further, you can inspect the filament end to get clues if this is the issue. Heat the hot end to a high temperature such as 230C, then pull the filament out from the extruder. Note that it may be difficult to pull out. Once removed, if you see a large wide section at the tip of the filament, this is a strong indicator that heat is creeping into the cold end.
Heat creep has a few common causes:
The hot end is hotter than you think
Confirm that the thermistor is placed in the thermistor hole on the heater block, and that the side screw is not too loose. Be sure that you tighten the screw until it gives a bit of resistance and not any further, since overtightening the screw can damage the thermistor. If the thermistor is not in place, it will give readings lower than the real temperature and the printer will heat the hot end more to compensate. This additional heat will seep into the cold end and cause jamming even if the cooling system is working properly.
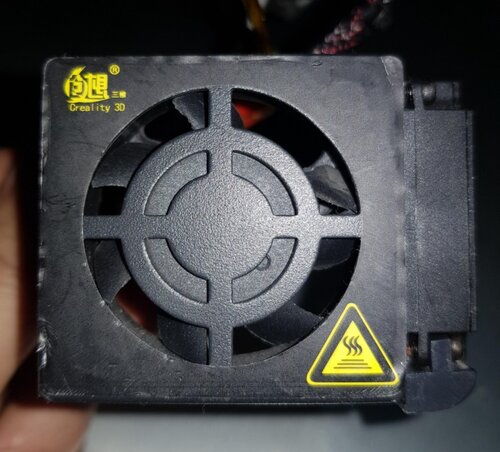
The hot end fan is either completely stopped or is running slowly
Check the hot end fan, which is mounted to the hot end enclosure directly in front of the heat sink (the fan on the side of the enclosure is the part cooling fan, which is not relevant here). Remove any plastic pieces or other debris from the fan, and ensure that it spins fast enough to feel the airflow from about an inch away. Also check that all of the fan fins are still attached to the fan. If the fan feels weak or is damaged, replace it (see replacing the hot end fan in the Solutions section below).
The heat sink is very dusty and not effectively dissipating heat
Remove the enclosure of the extruder and inspect the heat sink. Remove any dust using compressed air or a small tool, making sure to clear any material.
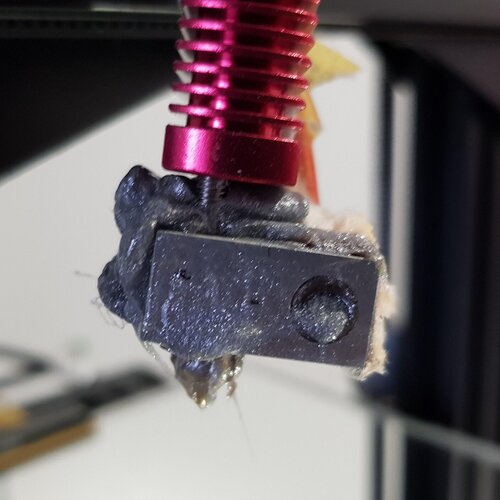
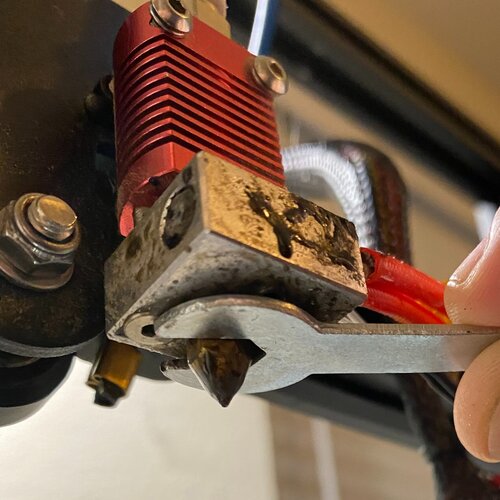
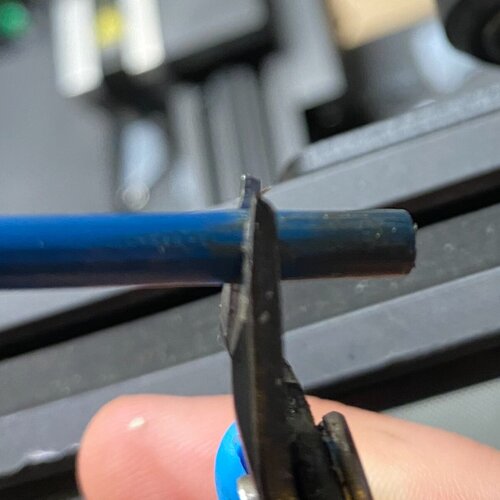
Extra material or gunk between the cold and hot zones
If you have had print failures, material can sometimes get caught in the area between the hot and cold zones. This unwanted material will allow more heat to move from the heater block to the heat sink, and should be cleaned out. This is easy to do with the hot end heated using the included clippers or small pliers.
3. There is a gap in the path of the filament where the filament is getting stuck
Even if the hot end is being cooled perfectly, another issue that causes jams is if a gap forms in the filament path. This usually happens where the PTFE tube meets the top of the nozzle. The filament is beginning to melt at this point, so it will expand to fill any gaps as you are printing.
This gap can be caused by improper installation of the PTFE tube, or can increase over time due to retraction movements of the filament, which pull back on the tube. Over time, this can cause the coupling on top of the hot end to loosen its grip, allowing a gap to form.
Another cause for the gap is if the PTFE tube has worn down significantly, which happens over time as you print a lot of parts. This has the same effect, where filament fills the gaps and causes additional friction.
Regardless of the cause, you can diagnose and fix these issues by performing a “PTFE Pushthrough”, outlined in the Solutions section of the article.
Repairing the Hot End
This section includes step-by-step guides for various hot end fixes. In most cases, you can replace a larger component, such as a full hot end assembly, in much less time than diagnosing and replacing individual parts. The trade off, of course, is that the full assembly will cost more. You’ll have to choose which approach makes the most sense for you. We’ll start with replacing individual components, then look at the more comprehensive replacements.
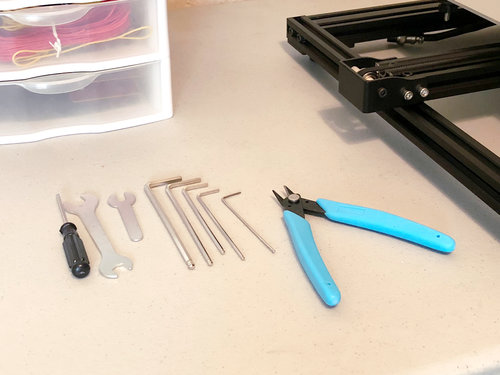
Some of these repairs can be done with just the tools that come with the printer (Allen wrenches, wrenches, and clippers), however there are a couple other tools/supplies you may need for others (we’ve linked to the ones we use from Amazon):
- Wire Strippers – required for replacements that involve wiring a new sensor.
- Screw connectors – these are useful for quickly connecting new wires, if you aren’t as concerned with the appearance of the repair.
- Soldering Iron and Heat Shrink Tubing- for a cleaner looking repair, use solder and heat shrink to connect wires.
- Heat Gun – useful for heating the hot end if you aren’t able to heat it when replacing the thermistor or heater cartridge. We also use this to help with post processing prints since it quickly cleans away any strings.
Removing the Hot End Enclosure/Shroud
Required tools: Allen wrenches included with the printer
Before completing any of these repairs, you’ll need to remove the enclosure (also called the shroud) to access the hot end. The enclosure is attached with one or two screws that you can remove using the Allen wrenches included with the printer.
Remove the screws shown in the diagram below corresponding to your printer.
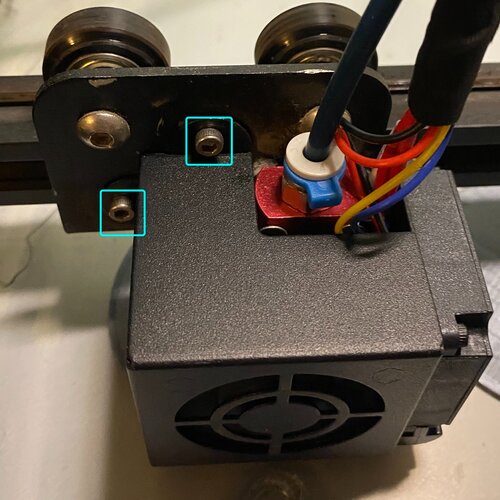

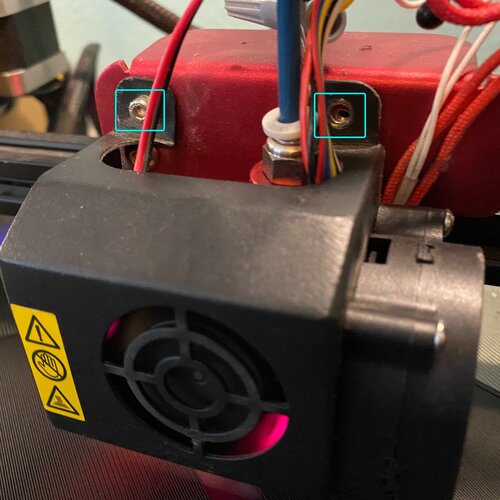
Once detached, remove the enclosure and set it aside carefully, since the fan wires still attach it to the rest of the printer.
Replacing the Thermistor
Required tools: Allen wrenches included with the printer, Phillips screwdriver, wire strippers, and soldering iron or wire connectors
Required Parts: Thermistor for Creality Printers. You can find one here – choose the option with xh connector.
- Remove the hot end enclosure (see detailed instructions above).
- Remove the hot end sock, if one is present.
- Loosen the Philips screw on the side of the heater block and unscrew it as far as possible without removing it.
- If you are able to heat the hot end from the printer, heat the printer to a low temperature such as 170C before starting the repair, then turn the heat off and immediately remove the screw while the hot end is still hot. (Do not remove the screw or thermistor while still heating the hot end!)
- Otherwise, use a heat gun or soldering iron to heat the heater block if you are unable to loosen the screw.
- Gently pull the smaller white wires to remove the thermistor from the hot end. Do not pull hard or you may rip the wires from the sensor, making it very difficult to remove. If you can’t remove it, applying heat as in the last step will help.
- If you aren’t able to remove it, don’t worry, a full hot end assembly isn’t too expensive, and you can replace it using the instructions below.
- Cut the thermistor (white) wires using the wire strippers, and strip the ends of the wires. You may need to cut off the Kapton tape holding the heater cartridge and thermistor wires together in order to do so. (This tape is strictly for cable management).
- On the new thermistor, cut the wire about 6″ from the sensor, and strip the ends.
- Connect the new thermistor to the wires on the printer. Either printer wire can be connected to either thermistor wire. Solder or use screw connectors to attach the wires (we typically use the screw connectors since they are much faster).
- Adjust the thermistor and wires as shown in the image, then install the screw, but only turn it enough to stay in place. Insert the thermistor bulb into the hole with one wire on either side of the screw. While pulling up gently on the wires to keep them behind the screw head, tighten the screw until you feel resistance. Don’t overtighten since this can damage the thermistor.
- Verify that the wires are held securely by the screw, and that the printer temperature reading looks accurate (usually around 30-40C).
- Attach the hot end enclosure.
- Heat the hot end and verify the temperature increases as expected.

Replacing the Heater Cartridge
Required tools: Allen wrenches included with the printer, Wire Strippers and Soldering Iron or crimp Connectors
Required Parts: 12V Heater Cartridge or most comonly a 24V Heater Cartridge. You will need to be certain about the voltage of your printer, most creality printers are 24 volts but, as with anything to do with creality, you can’t be sure because they chop and change their products without notice. The easiest way is to check the power supply on your printer. You can find a 24 volt heater here.
Raise the printer height to at least 150mm, then remove the Enclosure (see detailed instructions above)
- Remove the hot end sock, if one is present.
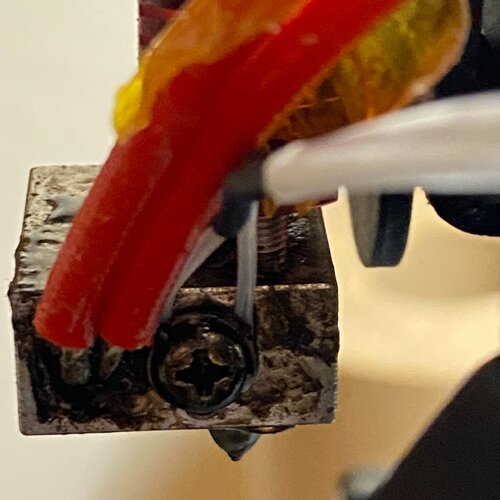
- Loosen the small grub screw directly underneath the heater cartridge.
- If you are able to heat the hot end from the printer, heat the printer to a low temperature such as 170C before starting the repair, then turn the heat off and immediately remove the grub screw while the hot end is still hot. (Do not remove the screw or thermistor while still heating the hot end!)
- Otherwise, use a heat gun or soldering iron to heat the heater block if you are unable to loosen the grub screw.
- Use the control box to lock the motors by moving the printer along Y, then use an Allen wrench or screwdriver to push the cartridge out from the other side of the heater block. Heat can help here, and it may require some force.
- If you aren’t able to remove it, don’t worry, a full hot end assembly isn’t too expensive, and you can replace it using the instructions below.
- Cut the red wires using the wire strippers, and strip the ends of the wires. You may need to cut off the Kapton tape holding the heater cartridge and thermistor wires together in order to do so. (This tape is strictly for cable management).
- On the new heater cartridge, cut the wire about 6″ from the cartridge, and strip the ends.
- Connect the new heater cartridge to the wires on the printer. Either printer wire can be connected to either cartridge wire. Solder or use screw connectors to attach the wires (we typically use the screw connectors since they are much faster).
- Insert the new heater cartridge into the slot, then tighten the grub screw to secure it.
- Heat the hot end and verify the temperature increases as expected.
- Once heated, check again that the heat cartridge doesn’t move if you push on it with an Allen wrench, and tighten the grub screw.
- Re-attach the enclosure.
Required tools: Allen wrenches included with the printer, Phillips screwdriver (for some printers), soldering iron or crimp connectors.
Required Parts: 12V 40×40 fan or 24V 40×40 fan
Hot End Fan replacement
- Turn the printer off.
- Remove the Enclosure (see detailed instructions above).
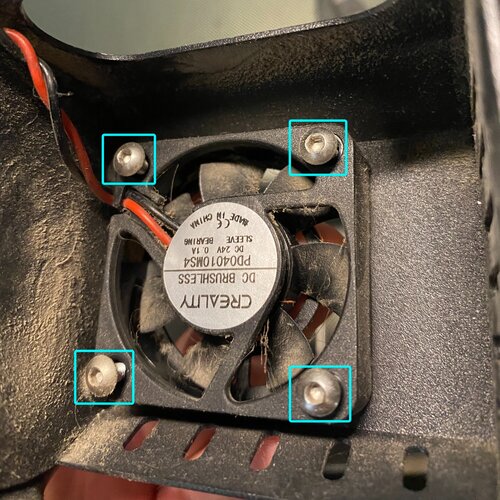
- Find the hot end fan on the enclosure, and remove the 3-4 screws holding it in place. Note the location of the exit wire so you can install the new fan in the same way.
- Cut the wires using the wire strippers, and strip the ends of the wires.
- On the new 40×40 fan, cut the wire about 6″ from the fan, and strip the ends.
- Connect the new heater cartridge to the wires on the printer. Either printer wire can be connected to either cartridge wire. Solder or use screw connectors to attach the wires (we typically use the screw connectors since they are much faster).
- Mount the new fan in the same way as the old fan using the screws.
- Turn the printer on, and verify that the fan turns on immediately. Ensure that the fan is blowing toward the hot end. If it is blowing outward away from the hot end, you will need to remove it and flip it over in the enclosure.
Hot End Assembly replacement (without enclosure)
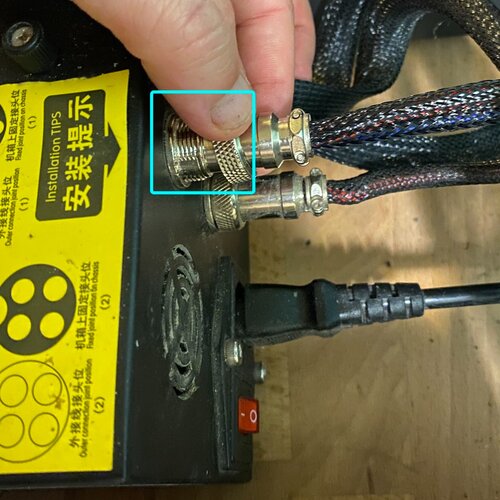
Note: For Creality CR-10 series printers, it is much easier to replace the hot end with the enclosure, since all of the hot end cables share a single plug to the control box. For other 3D printers, replacing just the hot end assembly is easier.
Required tools: Allen wrenches included with the printer, clippers, Soldering Iron or crimp Connectors (the Ender 5 series does not require a soldering iron or crimp connectors)
Required Parts: Hot End Assembly
- Turn the printer off.
- Remove the Enclosure (see detailed instructions above).
- Remove the PTFE tube at the extruder by pressing inward on the coupler top, then pulling out the PTFE tube. Unscrew the PTFE coupler using the included wrench tool.
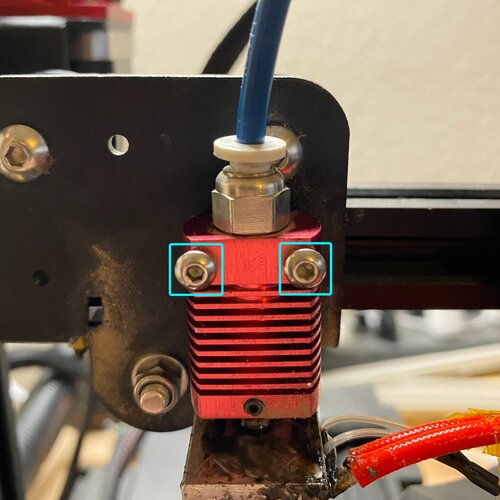
- Detach the hot end assembly by removing the two screws on the top of the heat sink.
- Cut the thermistor and heater cartridge wires. The old hot end can now be completely removed.Note: On the Ender 5 series, these cables can be unplugged instead; follow the cables to find their connectors. You can splice the wires if you prefer.
- Mount the new hot end assembly using the two long screws into the top of the heat sink.
- Strip and splice the heat cartridge and thermistor wires to the corresponding wires on the new hot end. Refer to the thermistor and heater cartridge replacement guides above for more detailed instructions.
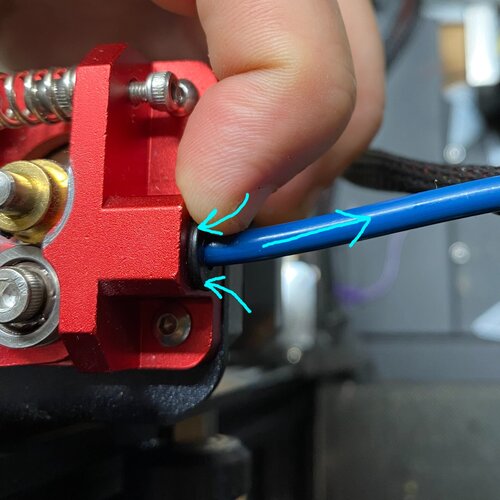
- Attach the new coupler and PTFE tube to the extruder by screwing in the coupler and pressing the tube into it as far as you can. Ensure it does not come out if you pull it.
- Re-attach the hot end enclosure.
- Verify that the hot end is able to heat up and maintain the correct temperature. Note that new hot ends will have a distinct smell for a short time due to residual oils inside the heater area; this does not indicate a problem.
Hot End Assembly Replacement with Enclosure for CR-10 Series Printers
Required tools: Allen wrenches included with the printer, clippers, Soldering Iron or crimp connectors (not needed for the CR-10 and Ender 5 series, which do not require wire spicing)
Required Parts: Hot End Assembly with enclosure
We only recommend this repair for the CR-10, CR-10s, CR-10 Mini, CR-10 S4, or CR-10 S5 since all hot end wires are bundled and can be easily unplugged from the control box. For other printers, it is better to replace just the hot end assembly without the enclosure. These steps apply to the Creality CR-10 series only.
- Follow steps 1-4 in the Hot End Assembly replacement guide to remove the existing hot end.
- Unscrew and detach the hot end cable bundle from the back of the control box.
- The hot end and enclosure can now be fully removed.
- Mount the new hot end assembly using the two longer screws on the top of the heat sink.
- Attach the new PTFE tube to the extruder by pressing it in as far as you can. Ensure it does not come out if you pull it.
- Attach the new enclosure.
- Plug in the cable bundle to the controller box.
- Verify that the hot end is able to heat up and maintain the correct temperature. Note that new hot ends will have a distinct smell due to residual oils inside the heater area; this does not indicate a problem.
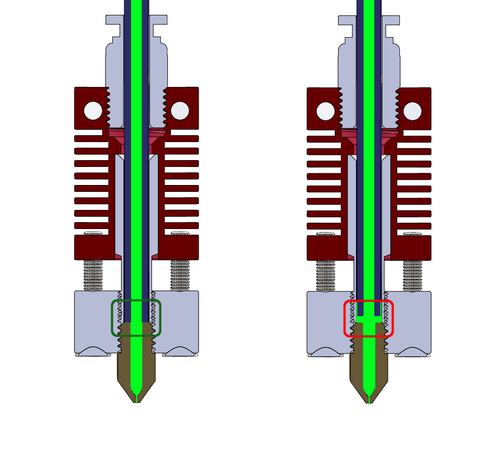
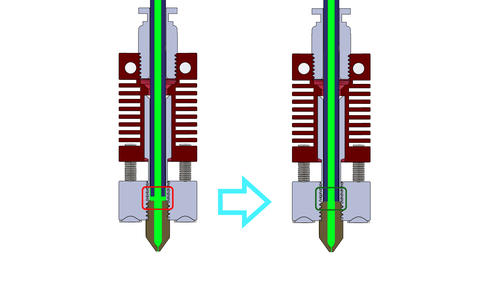
PTFE Pushthrough
This technique is useful if you suspect buildup between the nozzle and PTFE tube, which can cause jamming as shown in the left-hand diagram below. The push through will clear out any filament from the hot end so the PTFE can be made flush with the nozzle, as in the right-hand diagram.
Required tools: Allen wrenches, wrenches, Sharp blade.
Required Parts: New Nozzle (optional, but highly recommended)
If the coupler is still on the PTFE tube, remove it completely.
Quick Steps
Remove the enclosure.
Heat the hot end to 180C, and remove any filament in the hot end.
Remove the nozzle using the small nozzle wrench tool. Note you’ll need to turn it clockwise to loosen, since it is mounted upside down from your perspective standing over the printer.
Use the larger wrench to remove the PTFE coupler from the top of the nozzle, and pull it and the PTFE tube out of the top of the hot end.
Remove the coupler from the PTFE tube by pressing down on the top of the coupler to release it and pulling the tube out of the coupler.
Inspect the end of the PTFE tube. Often, it will be discolored or worn down. Use the clippers to trim any discolored part off the tube. Be sure to cut the tube as straight as possible to ensure it will be flush with the nozzle.
Push the PTFE tube all the way through the hot end until it comes out the bottom. This will push out any material that is caught in a gap between the PTFE and the nozzle. Most likely, you’ll see some melted filament on the end. Remove it with the clippers, and repeat the push through process until there is no more melted filament on the tube.
Remove the coupler from the PTFE tube, and screw it to the top of the hot end by hand. Then, loosen it a single turn. This will give it room to press down the PTFE once the nozzle has been installed.
Install a new nozzle (or the old one if you don’t have an extra, but we recommend replacing the nozzle any time you take it off since they are so cheap and do wear down over time).
Push the PTFE tube into the hot end as far as possible, then tighten the coupler using the wrench to ensure that the PTFE is pressed flush against the nozzle.
That’s it! You should now be printing like brand new. If you find your hotend is too difficult to take appart, or you don’t have time to clean it, you can grab a new hotend kit here